mqtt智能车
我来帮你实现一个基于ESP8266、DRV8833和MQTT的智能车控制系统。
硬件连接
ESP8266与DRV8833连接
1
2
3
4
5
6
7
ESP8266    DRV8833
GPIO5(D1) -> AIN1
GPIO4(D2) -> AIN2
GPIO14(D5)-> BIN1
GPIO12(D6)-> BIN2
6~12V      -> VCC
GND       -> GND
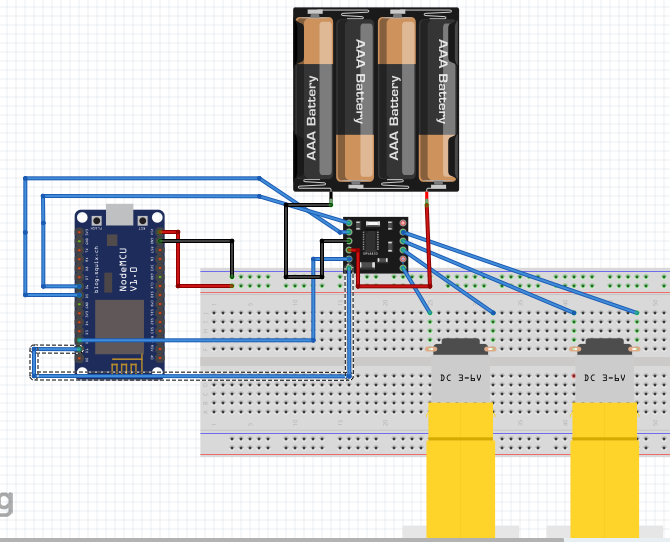
电源连接
- DRV8833的VM引脚接电机电源(6-12V)
- DRV8833的VCC接3.3V(逻辑电源)
Arduino代码实现
1
2
3
4
5
6
7
8
9
10
11
12
13
14
15
16
17
18
19
20
21
22
23
24
25
26
27
28
29
30
31
32
33
34
35
36
37
38
39
40
41
42
43
44
45
46
47
48
49
50
51
52
53
54
55
56
57
58
59
60
61
62
63
64
65
66
67
68
69
70
71
72
73
74
75
76
77
78
79
80
81
82
83
84
85
86
87
88
89
90
91
92
93
94
95
96
97
98
99
100
101
102
103
104
105
106
107
108
109
110
111
112
113
114
115
116
117
118
119
120
121
122
123
124
125
126
127
128
129
130
131
132
133
134
135
136
137
138
139
140
141
142
143
144
145
146
147
148
149
150
151
152
153
154
155
156
157
158
159
160
161
162
163
164
165
166
167
168
169
170
171
172
173
174
175
176
177
178
179
180
181
182
183
184
185
186
187
#include <ESP8266WiFi.h>
#include <PubSubClient.h>

// WiFi配置
const char* ssid = "你的WiFi名称";
const char* password = "你的WiFi密码";

// MQTT配置
const char* mqtt_server = "broker.emqx.io"; // 或你的MQTT服务器地址
const int mqtt_port = 1883;
const char* mqtt_user = ""; // MQTT用户名(如果需要)
const char* mqtt_password = ""; // MQTT密码(如果需要)

// MQTT主题
const char* control_topic = "smartcar/control";
const char* status_topic = "smartcar/status";

WiFiClient espClient;
PubSubClient client(espClient);

// 电机控制引脚
#define AIN1 D1  // GPIO5
#define AIN2 D2  // GPIO4
#define BIN1 D5  // GPIO14
#define BIN2 D6  // GPIO12

// 速度控制 (PWM范围0-1023)
int motor_speed = 600;

void setup() {
  Serial.begin(115200);

  // 初始化电机控制引脚
  pinMode(AIN1, OUTPUT);
  pinMode(AIN2, OUTPUT);
  pinMode(BIN1, OUTPUT);
  pinMode(BIN2, OUTPUT);

  // 停止所有电机
  stop();

  setup_wifi();
  client.setServer(mqtt_server, mqtt_port);
  client.setCallback(callback);
}

void loop() {
  if (!client.connected()) {
    reconnect();
  }
  client.loop();
}

void setup_wifi() {
  delay(10);
  Serial.println();
  Serial.print("连接到WiFi: ");
  Serial.println(ssid);

  WiFi.begin(ssid, password);

  while (WiFi.status() != WL_CONNECTED) {
    delay(500);
    Serial.print(".");
  }

  Serial.println("");
  Serial.println("WiFi已连接");
  Serial.println("IP地址: ");
  Serial.println(WiFi.localIP());
}

void callback(char* topic, byte* payload, unsigned int length) {
  String message = "";
  for (int i = 0; i < length; i++) {
    message += (char)payload[i];
  }

  Serial.print("收到消息 [");
  Serial.print(topic);
  Serial.print("]: ");
  Serial.println(message);

  // 处理控制命令
  handleControlMessage(message);
}

void reconnect() {
  while (!client.connected()) {
    Serial.print("尝试MQTT连接...");

    String clientId = "ESP8266SmartCar-";
    clientId += String(random(0xffff), HEX);

    if (client.connect(clientId.c_str(), mqtt_user, mqtt_password)) {
      Serial.println("已连接");

      // 订阅控制主题
      client.subscribe(control_topic);

      // 发布状态信息
      client.publish(status_topic, "Smart Car Connected");
    } else {
      Serial.print("连接失败, rc=");
      Serial.print(client.state());
      Serial.println(" 5秒后重试");
      delay(5000);
    }
  }
}

void handleControlMessage(String message) {
  message.trim();
  message.toUpperCase();

  if (message == "FORWARD" || message == "前进") {
    forward();
    publishStatus("Forward");
  }
  else if (message == "BACKWARD" || message == "后退") {
    backward();
    publishStatus("Backward");
  }
  else if (message == "LEFT" || message == "左转") {
    turnLeft();
    publishStatus("Turn Left");
  }
  else if (message == "RIGHT" || message == "右转") {
    turnRight();
    publishStatus("Turn Right");
  }
  else if (message == "STOP" || message == "停止") {
    stop();
    publishStatus("Stopped");
  }
  else if (message.startsWith("SPEED:")) {
    int new_speed = message.substring(6).toInt();
    if (new_speed >= 0 && new_speed <= 1023) {
      motor_speed = new_speed;
      publishStatus("Speed set to: " + String(motor_speed));
    }
  }
  else if (message == "STATUS" || message == "状态") {
    publishStatus("Ready - Speed: " + String(motor_speed));
  }
}

// 电机控制函数
void forward() {
  analogWrite(AIN1, motor_speed);
  digitalWrite(AIN2, LOW);
  analogWrite(BIN1, motor_speed);
  digitalWrite(BIN2, LOW);
}

void backward() {
  digitalWrite(AIN1, LOW);
  analogWrite(AIN2, motor_speed);
  digitalWrite(BIN1, LOW);
  analogWrite(BIN2, motor_speed);
}

void turnLeft() {
  analogWrite(AIN1, motor_speed);
  digitalWrite(AIN2, LOW);
  digitalWrite(BIN1, LOW);
  analogWrite(BIN2, motor_speed);
}

void turnRight() {
  digitalWrite(AIN1, LOW);
  analogWrite(AIN2, motor_speed);
  analogWrite(BIN1, motor_speed);
  digitalWrite(BIN2, LOW);
}

void stop() {
  digitalWrite(AIN1, LOW);
  digitalWrite(AIN2, LOW);
  digitalWrite(BIN1, LOW);
  digitalWrite(BIN2, LOW);
}

void publishStatus(String status) {
  client.publish(status_topic, status.c_str());
  Serial.println("状态更新: " + status);
}
Python MQTT控制客户端示例
1
2
3
4
5
6
7
8
9
10
11
12
13
14
15
16
17
18
19
20
21
22
23
24
25
26
27
28
29
30
31
32
33
34
35
36
37
38
39
40
41
42
43
44
45
46
47
48
49
50
51
52
53
54
55
56
57
58
59
60
61
62
63
64
65
66
67
68
69
70
71
72
73
74
75
76
77
78
79
80
81
82
83
84
85
86
import paho.mqtt.client as mqtt
import time

# MQTT配置
MQTT_BROKER = "broker.emqx.io"
MQTT_PORT = 1883
CLIENT_ID = "SmartCar_Controller"

# 主题
CONTROL_TOPIC = "smartcar/control"
STATUS_TOPIC = "smartcar/status"

class SmartCarController:
    def __init__(self):
        self.client = mqtt.Client(CLIENT_ID)
        self.client.on_connect = self.on_connect
        self.client.on_message = self.on_message

    def on_connect(self, client, userdata, flags, rc):
        print(f"已连接到MQTT代理,返回码: {rc}")
        client.subscribe(STATUS_TOPIC)

    def on_message(self, client, userdata, msg):
        print(f"收到状态: {msg.topic} - {msg.payload.decode()}")

    def connect(self):
        self.client.connect(MQTT_BROKER, MQTT_PORT, 60)
        self.client.loop_start()

    def send_command(self, command):
        self.client.publish(CONTROL_TOPIC, command)
        print(f"发送命令: {command}")

    def disconnect(self):
        self.client.loop_stop()
        self.client.disconnect()

def main():
    controller = SmartCarController()
    controller.connect()

    time.sleep(2)  # 等待连接建立

    try:
        while True:
            print("\n=== 智能车控制 ===")
            print("1. 前进")
            print("2. 后退")
            print("3. 左转")
            print("4. 右转")
            print("5. 停止")
            print("6. 设置速度")
            print("7. 查看状态")
            print("8. 退出")

            choice = input("请选择操作 (1-8): ").strip()

            if choice == '1':
                controller.send_command("FORWARD")
            elif choice == '2':
                controller.send_command("BACKWARD")
            elif choice == '3':
                controller.send_command("LEFT")
            elif choice == '4':
                controller.send_command("RIGHT")
            elif choice == '5':
                controller.send_command("STOP")
            elif choice == '6':
                speed = input("请输入速度 (0-1023): ").strip()
                controller.send_command(f"SPEED:{speed}")
            elif choice == '7':
                controller.send_command("STATUS")
            elif choice == '8':
                break
            else:
                print("无效选择!")

            time.sleep(1)

    except KeyboardInterrupt:
        print("\n程序结束")
    finally:
        controller.disconnect()

if __name__ == "__main__":
    main()
HTML网页控制界面
1
2
3
4
5
6
7
8
9
10
11
12
13
14
15
16
17
18
19
20
21
22
23
24
25
26
27
28
29
30
31
32
33
34
35
36
37
38
39
40
41
42
43
44
45
46
47
48
49
50
51
52
53
54
55
56
57
58
59
60
61
62
63
64
65
66
67
68
69
70
71
72
73
74
75
76
77
78
79
80
81
82
83
84
<!DOCTYPE html>
<html>
<head>
    <title>智能车控制</title>
    <script src="https://unpkg.com/mqtt/dist/mqtt.min.js"></script>
    <style>
        .control-panel {
            text-align: center;
            margin-top: 50px;
        }
        .btn {
            font-size: 20px;
            padding: 15px 30px;
            margin: 10px;
            border: none;
            border-radius: 10px;
            cursor: pointer;
            background-color: #4CAF50;
            color: white;
        }
        .btn:hover {
            background-color: #45a049;
        }
        .status {
            margin-top: 20px;
            padding: 10px;
            background-color: #f0f0f0;
            border-radius: 5px;
        }
    </style>
</head>
<body>
    <div class="control-panel">
        <h1>智能车远程控制</h1>

        <div>
            <button class="btn" onclick="sendCommand('FORWARD')">前进</button><br>
            <button class="btn" onclick="sendCommand('LEFT')">左转</button>
            <button class="btn" onclick="sendCommand('STOP')">停止</button>
            <button class="btn" onclick="sendCommand('RIGHT')">右转</button><br>
            <button class="btn" onclick="sendCommand('BACKWARD')">后退</button>
        </div>

        <div style="margin-top: 20px;">
            <label>速度控制:</label>
            <input type="range" id="speedSlider" min="0" max="1023" value="600"
                   onchange="setSpeed(this.value)">
            <span id="speedValue">600</span>
        </div>

        <div class="status">
            <h3>状态信息</h3>
            <div id="statusDisplay">等待连接...</div>
        </div>
    </div>

    <script>
        // MQTT连接
        const client = mqtt.connect('ws://broker.emqx.io:8083/mqtt');

        client.on('connect', function() {
            console.log('MQTT连接成功');
            document.getElementById('statusDisplay').innerHTML = '已连接到MQTT服务器';
            client.subscribe('smartcar/status');
        });

        client.on('message', function(topic, message) {
            console.log('收到消息:', topic, message.toString());
            document.getElementById('statusDisplay').innerHTML =
                new Date().toLocaleTimeString() + ': ' + message.toString();
        });

        function sendCommand(command) {
            client.publish('smartcar/control', command);
            console.log('发送命令:', command);
        }

        function setSpeed(speed) {
            document.getElementById('speedValue').innerHTML = speed;
            sendCommand('SPEED:' + speed);
        }
    </script>
</body>
</html>
使用说明
- 硬件准备:按电路图连接ESP8266和DRV8833
- 修改配置:在代码中填入你的WiFi信息和MQTT服务器信息
- 上传代码:将Arduino代码上传到ESP8266
- 测试控制:
- 使用Python脚本控制
- 或使用网页界面控制
- 支持命令:FORWARD、BACKWARD、LEFT、RIGHT、STOP、SPEED:数值
扩展功能
- 可以添加超声波传感器实现避障
- 添加摄像头模块实现视频监控
- 集成语音识别控制
- 添加路径规划算法
这个系统提供了完整的物联网智能车解决方案,你可以根据具体需求进行调整和扩展。